Friday, August 29, 2014

Tools for School! Back To School sewing projects.

Posted by Kashmira


Well, September is here and kids everywhere will be heading back to school (if they haven't already!). I remember feeling excited on the first day of school every year - meeting classmates and friends again, talking about what we all did during the summer vacation and of course, oohing and aahing over new funky shaped erasers and school bags and all the other important tools of learning. (Of course, all the excitement dissipated slowly over the week as homework started to pile up!)

So we thought today we'll do a round up of our favorite back to school sewing tutorials from the web. 

1) Pencil Pouch by Gwenny Penny

Who doesn't need a cute little pencil case to show off at school? There are tons of tutorials for making regular rectangular zippered pouches but this pencil shaped pencil pouch is just too cute for words. It is very well made and the tutorial is clear with great pictures of every step. 


2) Sandwich and Snack bags from Life Your Way

All that studying is got to make those kids hungry! Here's a quick way to make some reusable sandwich and snack bags that can go in a backpack in addition to your kids' lunch bag and also comes in super handy on other days out.
Check out the tutorial here: Life Your Way Snack Bag


3) Water Bottle Tote from The Long Thread

All that snacking is got to make those kids thirsty! Time to make this simple and cool water bottle holder - I like that it has elastic at the top to keep the bottle in, and also that the tutorial gives you instructions on how to modify the size if required.
Here's where to find the tutorial: The Long Thread Water Bottle Tote

4) Journal Cover from Bloom and Blossom
All right, enough eating and drinking and now back to the books. How lovely it would be to have a book that looks inviting! This is a well constructed journal cover tutorial and like the previous one lets you make yours according to your book size. I won't judge the book, but the cover sure is nice!

These would make great gifts to any kids you know that are going back to everyday drudgery school!

Monday, August 25, 2014

ePattern and Tutorial - Flower Power Hair Accessory Organizer

Posted by Kashmira

A couple of months ago I had the joy of visiting my darling niece for a few days. Usually I'm denied the pleasure of dressing up a little girl in pretty frocks and doing her hair. That's coz I have a little guy who he has his own ideas about dressing up that involve wearing the same stinky blue car t-shirt 7 days a week (you can tell what the whole week's menu was just by looking at it) - but that's a different story. 

So of course when it came to doing all things girly with my little niece, I grabbed the opportunity with both ponytails. Although she's an easy-going toddler, not unruly at all, unfortunately the same cannot be said for her hair! And like every other little girl out there, she had a plethora of pins, rubber bands and the like. So to cut a long story short (and that's how her hair got too, by the end of my visit!), I got to design her a nice summery hair organizer that now hangs in her bathroom.


--------------------------------------------------------------------------------------
Here are some details about the project:

Level: Beginner/Intermediate. (No complex sewing techniques required other than sewing on curves.)

Time Required: 1 hour.

Finished Size: The finished organizer is approx 21" long and 5.5" wide.

Supplies
Basic sewing supplies such as sewing machine, thread, needle, pins, cutting mat and rotary cutter (optional), scissors, ruler/ tape, tailor's chalk or fabric marker, iron for pressing.

Fabric supplies - This project requires relatively small pieces of fabric. So it you're into sewing, you might find these are already in your stash.

1. ¼ yard or 1 Fat Quarter fabric suitable for the Flower
2. ¼ yard or 1 Fat Quarter fabric suitable for the Flower Pot
3. ¼ yard or 1 Fat Quarter fabric for Stem (Green)
4. ¼ yard Batting
5. A piece of Felt that is 3” * 7” (Green)
6. A piece of slightly stiff clear plastic that is size 6” * 6”
7. A piece of stiff paper (eg Cereal box) that is size 1.5” * 13”
8. A Button up to 1.5” diameter in size that co-ordinates with the Flower fabric
9. A piece of Ribbon 4” long that co-ordinates with the Flower Fabric

Link to ePattern and Tutorial: Download the ePattern and Tutorial pdf here for $5.

--------------------------------------------------------------------------------------


This would make a marvelous and very functional gift for any little girl that dresses her tresses. What's more, it doesn't require any special materials. So go ahead and make one of these to tame those unruly hair clips and rubber bands that are hair today, gone tomorrow!

Again, here's the link to the pattern: Flower Power Hair Accessory Organizer on Craftsy. The price is $5. 

Thursday, August 21, 2014

Potato carving and stamping: Spud-tastic fabric prints!

Posted by Kashmira

As I sit here looking out of the window, I see the leaves already turning color and realize summer is quickly slipping through our fingers here in Minneapolis. I shudder when I think of the warm welcome (-40 degrees) we received when we arrived here in January. You can imagine how crazily happy we are at the moment to bask in the hot sun. One of my fondest memories of our first Minneapolis summer was being able to step out of the house.... and walk down the street... for more than 30 secs....without getting a single frostbitten ear!

But the cold is still some time away and I want to revel in what's left of the glorius, glorius summer filled with countless lakes, trails and picnics. And of course, the vibrant, bustling farmers' markets - the mounds of fresh veggies and produce.  Another of my fondest memories was going strawberry picking with my friends and family. So in celebration of the spectacular season, here's a way to create your own little piece of summer. 

1) Take a couple of longish potatoes and a couple that are smaller. 
2) Slice them in half lengthwise. 
3) Draw a rough outline of the vegetable/ fruit you'd like to print. 
4) Take a small, sharp knife and go around the edge of the outline about 1/2" deep. Then, carefully slice horizontally from the outside in until you reach the vertical cuts you'd made earlier and then just lift up the piece. You don't have to super precise - but the basic idea is to get a clear edge of a motif that is at a higher level than the rest of the potato to make a stamp.

When I did this a couple of years of ago, I'd made stamps of a strawberry, carrot and radish. Notice how you have options to either carve the whole picture on a single spud (as in the carrot and radish) - in this case, you will have to paint the stamp sections separately with a paintbrush. I opted to make separate sections for the strawberry fruit, stem and leaf, just to be able to dip it in a single pile of color at a time and to have more control over print placement. I used fabric colors since that's what I wanted to print on.


I decided to stamp the strawberries in a little rustic-looking patch. Then to connect them I used moss green embroidery floss to make a running stitch by hand.


The carrot and radish I stamped alternately on a strip of fabric I had leftover from some other project. 


I used the strip to make a sturdy ol' market tote, great for filling up with all that fresh farmers' market produce!


If you haven't tried making your stamps yet, do it and I guarantee you'll get addicted! As you can see - potato carving? It has my stamp of approval :)

Have a happy what's-left-of-summer!

Monday, August 18, 2014

Upcycled Legging Cutoffs

Posted by Kashmira

A few weeks ago my friend came over armed with a bunch of her 4 year old daughter's jeans and leggings...and with a perplexing mystery. The kiddo had somehow managed to wear holes at the knees of all these pants. (Climbing fences? Crawling in the mud? That mystery still remains unsolved.) So I cut them off (the leggings, not the knees) below the holes and hemmed the edges so that they could then be used in their new avatar of shorts. Which left me with some legging cut-offs that promptly went in my 'use-it-for-something-later' stash.
That's how I've lined up 5 upcycled legging cut-off projects in increasing order of complexity (ranging from 'pff, child's play to meh, that's it?!').
1. Bath Accessories  - No sew, no glue
2. Pen stand - No sew, minimal glue
3. Drawstring Bag - Very very minimal sewing
4. Mobile Cozy - Very minimal sewing
5. Little Girls' Sling Bag - Minimal sewing
See what I mean? :)

1. Bath Accessories
I'd bought a plain white soap dispenser and toothbrush holder by way of furnishing our guest bathroom and planned to paint something on it. But if you literally have 2 minutes before the guests arrive and you also have a pair of suitable legging cut-offs lying around, you could just do this:

What you need: Bathroom accessories you want to cover, scissors, tape measure and legging cut-offs.

Measure the length of dispenser you want to cover and cut legging to that length + 1/2". Then just pull the legging over the dispenser, leaving the extra 1/2" on top. Next fold the extra bit inward to give a clean upper edge. Since this is a knit legging, it stays up just fine!

2. Pen stand 
What you need: Used tin/can that is washed and dried, construction paper, piece of ribbon/ ric rac, tape measure/ ruler, marker, scissors, glue.


Step 1. Measure the height and circumference of the tin. Cut a rectangle out of construction paper with length = circumference + 1" and width = height + 1". Also draw an outline of the bottom circular edge of the tin on the paper and cut it out. Next cut the legging length = height of tin + 1/2". Keep this aside for now.


Step 2. Glue the circle to the inner bottom of the tin. Roll the rectangle such that shorter edges overlap and place it into the tin. Make sure the sides of the paper all touch the tin and mark the edge where the sides overlap.


Step 3. Apply glue onto the overlapped paper with marked edge for reference to make a tube that will exactly fit inside the tin. Then apply glue to the inner sides of the tin and fix the tube in place. You will have about an inch of paper sticking out of the tin.

Step 4. Make cuts in the paper that's sticking out, apply glue onto each notch and fold it over on the outer edge of the tin.


Step 5. Then apply glue to the outer sides of the tin, pull the legging cut-off over it and stick in place. Glue the top 1/2" border to the inside of the tin and cover the edge with ribbon or ric rac.


Step 6. Lastly, just add any sort of decoration you like. I found this bit of fabric that was the perfect fit for my tin and glued it on. Here's your adorable upcycled pen stand!


2. Drawstring Bag
Need a little bag for any kind of tiny knick knacks?
What you need: Marker, scissors, ribbon (Cut 2 pieces of ribbon that are 3 times the width of the legging tube.)

Step 1. Turn the legging tube inside out and sew the bottom opening closed with either 1/4" or 1/2" seam allowance. Turn it right side out.

Step 2. About 1 inch from the top, mark tiny vertical lines about 3/4" apart on the front and back of the tube.


Step 3. Hold the marked lines in a pinch and make tiny cuts one by one for the ribbons to pass through. (How convenient is it that knits don't fray!)


Step 4. Weave in the first bit of ribbon starting from the leftmost front cut all the way around the tube. Bring other end of the ribbon out of the leftmost cut at the back. Knot the two ends.


Step 5. Weave in the other ribbon similar to Step 4, but in the opposite direction. Pull on the two knotted ends and it's a cinch! The cute little drawstring bag is done!


4. Mobile Cozy
What you need: Legging cut-off, scissors, about 1/4" wide elastic (cut a piece that is 3 quarters the width of the legging tube.)

Step 1. Turn the legging tube inside out and place your mobile phone over it lined up with one side to mark a line 1/4" from the phone on the long edge. This is to determine how wide the cozy needs to be. 


Step 2. Sew along the marked line to make the cozy as wide as the phone. Then sew along the bottom short edge to close the legging tube.


Step 3. Fold the top edge of the legging tube about 1/2" over and sew to make a casing for the elastic. Leave a 1" gap for sliding the elastic through. Attach a safety pin to one end of the elastic and then slide through the casing. 


Step 4. Sew the two ends of elastic closed. Next, sew the gap in the casing closed. Turn the legging right side out and your cell phone is all set to get cozy!


5. Little Girl's Sling Bag
What you need: Denim (or cotton) cut-off, button, piece of chord, either 20" long crossgrain ribbon or piece of fabric 20" * 2.5", other items to decorate bag (optional).

Step 1. If you've opted to embellish the front of the bag, do it now. I went through my stash of fabric collected especially for fussy cutting and chose the googly-eyed little butterfly. I sewed that on the front and distressed the edges a bit. You can make a design with buttons, or use fabric paints, whatever catches your fancy!

Step 2. Fold the top edges over twice and hem or sew around it.


 Step 3. Fold the tube over from the top 1 inch and mark the spot where your button should go. Sew the button. Then on the back of the tube, mark the spot where the loop of chord should go. Cut the length of chord as per the diameter of the button and sew the chord onto the top back edge.


Step 4. Fold the top and close the bag by looping over the button. This will help determine the points on either side of the bag where the sling handle ends should go. If you're using a fabric handle instead of ribbon, fold the fabric in half lengthwise and finger press or iron the crease. Open it up and fold again lengthwise from either side to the crease. Fold over again so that raw edges are now towards the inside. Sew along the length to make the handle. Stitch the ends of the handle/ ribbon to the points marked on either side of the bag.

And that's the sling bag ready for it's day out!


Whew! We're done and now it's time for me to leg it!  

Thursday, August 14, 2014

FREE ePattern and Tutorial - Cushiony Carrot Crinkle Toy

Posted by Kashmira

Ever had one of those emergencies where you had to quickly come up with an adorable infant gift within a time crunch? No? Um.. well here's a tutorial anyway for a cute little crinkle toy. Coz when it comes to babies, there's nothing quite as amusing as the puckery, crumply, creasy sound of plastic! 

We've gone one step ahead and made a toy that's not just crinkly, it's also soft and cushiony. And the best part? All you need to spend time-wise is an hour at most, from start to finish.


--------------------------------------------------------------------------------------
Here are some details about the project:

Level: Beginner/Intermediate. (No complex sewing techniques required other than sewing on curves.)

Time Required: 1 Hour or less

Supplies
  • Basic sewing supplies such as sewing machine, thread, needle, pins, cutting mat and rotary cutter (optional), scissors, ruler/ tape, tailor's chalk or fabric marker, iron for pressing.
  • Fabric supplies as follows:

  1. ¼ yard or 1 Fat Quarter orange fabric for the carrot
  2. ¼ yard or 1 Fat Quarter green fabric for the leaves.
  3. About 20 to 50g (a handful) polyfill for stuffing
  4. A piece of crinkly plastic or cellophane, like an empty bag of baby wipes, scrap plastic packaging or bag of chips (washed and dried)
Finished Size: The finished carrot is approx 9" long and 4" wide.

Link to ePattern and Tutorial: Download the ePattern and Tutorial pdf here


--------------------------------------------------------------------------------------

Here's an idea: Pair up this crunchy carrot with a popular bunny board book and you have a winning combination of handmade and ready made gift!

Some suggestions for the accompanying board book:
1) 'Guess How Much I Love You' by Sam McBratney
2) 'Goodnight Moon' by Margaret Wise Brown
3) 'The Tale of Peter Rabbit' by Beatrix Potter


So give this toy a go and gift it to an unsuspecting baby who's sure to say 'It's been nice gnawing you!'

Monday, August 11, 2014

A Vibrant Panel Quilt

Posted by Nupur

I love giving handmade gifts when I can, and a handmade gift is even more fun to make when the recipient is a baby. My daughter's school administrator is expecting her first child, a little boy. This lady works very hard to run the daycare center smoothly and to plan wonderful activities for the children, so to express our good wishes, I decided to make her a baby quilt.


I asked her if she had any favorite nursery colors and was told that they wanted the baby's room to be bright and colorful (good answer!) and this fabric panel immediately came to mind- I bought it just last month from SR Harris in MN.


Panel quilts are quite wonderful for making gift quilts. I'm eager to put in love and time and effort but it just wouldn't be practical to spend months making a quilt. Printed panels give me a starting point for the quilt but I still have the opportunity to make it my own by adding blocks, sashing and borders.

The Panel
This panel is called Jungle Bunch by Wendy Bentley for Timeless Treasures. The vibrant colors and happy animals are adorable. The starting panel was 24 inches wide and 44 inches long.

Piano Key Sides
To add some width, I added a piano key border. A piano key border is made of strips of bright, contrasting fabrics. I started by rummaging through my very modest fabric stash for a handful of fabrics that coordinated with the colors of the panel. Then I cut strips 3.5 inches wide x width of fabric and sewed them together. This long striped fabric was then sliced into 4 inch wide pieces that I joined together lengthwise to form a repeating border for each side.


Quilt top
The Batting
I thought I would have to buy a package of batting, but realized that I had a large strip of batting left over from another project- if I cut it in half vertically and sewed the halves together on top of each other using mattress stitch, I'd have just the right size of batting for this quilt. So that's what I did! After all, quilting is all about economy and making good use of what you have.

The Backing
In that same spirit, the backing was a large polka dot yardage that I had bought in a yard sale earlier this month- someone was de-stashing some great quality fabric!

The Quilting
Not my strong point! But straight line quilting I can generally manage. After making the quilt sandwich, I drew horizontal lines 1 inch apart. Then starting at the middle, I started to quilt over the lines. Two tips here: use a longer stitch length than usual (I used 4.0 mm) and quilt alternate lines, then go back and quilt the ones you skipped. This makes for more even quilting.


The Finished Quilt
I finished with a bright blue binding. The quilt is 36 inches wide and 42 inches long, which I feel is the perfect size to last a baby into the preschool years.


I'm linking this post to 
Made by you Monday
Take a look Tuesday
Too cute Tuesday

Friday, August 8, 2014

BOOK REVIEW - A Fresh Twist on Fabric Folding

Posted by Kashmira


Name of Book        : A Fresh Twist on Fabric Folding
Author                     : Rebecca Wat
Publisher                 : C&T Publishing.
Year of Publication : 2006


Book Summary
In A Fresh Twist on Fabric Folding, author Rebecca Wat takes the traditional art of origami (paper folding) and applies it to fabric to produce some interesting 3-D looks on quilts and a few other home décor items. The book describes six different folding techniques that result in inside-out flowers, pinwheels, bow-ties, 3-D petals, pleated leaves/ butterflies and square flowers.

Our takeaway
The folding instructions and quite clear and a few also come with variations to give different looks. The resultant 3-D forms are certainly eye-catching and simple to make. However, the application of the techniques in the book are mostly limited to quilts. If you're into making large quilts, Wat has provided detailed instructions from fabric yardage to assembly. 

Personally, after having tried a few of these folding methods out, it's exciting for me to think up new and interesting ways to use my bouquet of flowers and swarm of butterflies!

Three things that caught my eye
  1. Wat does not just use origami, but also sewing - both by hand and machine to really bring out interesting forms.  As a crafter who's also always looking for ways to mix and match different media/ techniques, I find this very inspiring.
  2. Creating 3-D forms is one thing, but Wat also shows how to piece them in a block to get that unusual texture on your quilt top.
  3. The Butterfly Dress - made by pleating squares of fabric and then piecing them together is the cutest project in the book, methinks!
Project I tried
Well, the fun Indian festival of Raksha Bandhan is just around the corner. In our household, stuff like greeting cards and rakhis were and are never store-bought, always hand-made. So while thinking of how to use a little fabric origami flower, I immediately thought of a rakhi! 


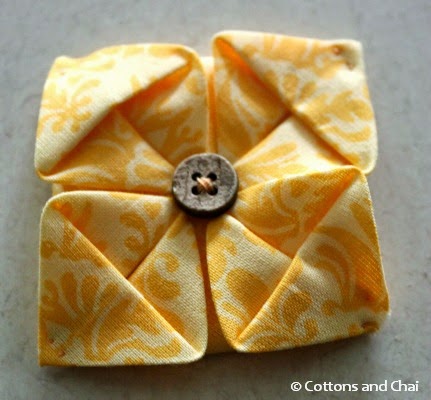
I chose a nice yellow fabric that evokes the auspicious color of turmeric. This is how it looked after folding.


I then tacked down the inner petal edges by adding a button which also doubled up as the flower center.

Next I tacked down the outer edges of the petals by making a couple of tiny stitches in each corner like so.

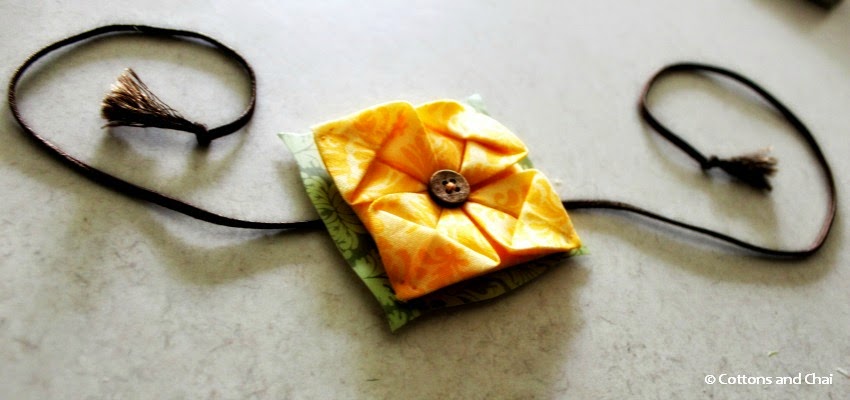
Then just to spruce it up a bit I cut a square piece of card stock paper, slightly larger than the flower square and trimmed the corners into decorative curves. Next I stuck it to the back of the flower, so that both right sides of paper and flower were facing up. Lastly I just stuck the flower to the mid point of a chord and voila! A 10 minute rakhi is ready :)


Oh did I mention that I usually made 'topical' rakhis for my cousin? Like the year (almost a decade ago) when he passed his final year dental college exams, I made him one that was the shape of lips, with comical buck teeth peeking out. I must say that drew quite a (toothy) laugh! Over the years it became our thing, where my cousin looked forward to the occasion-inspired rakhi instead of a very traditional (dare I say, boring) one. I guess the most memorable one for me was the rakhi I made him a couple of years ago when he became the proud father of two adorable little twin girls! 

So are you making a rakhi this year or are you too tied up? ;) 
Happy Raksha Bandhan everyone!

Monday, August 4, 2014

Tutorial: No-sew Selvage Art

Posted by Kashmira

About 3 years ago, after much thought, I decided to take the plunge and quit my software job to start my own little sewing business. I was based out of Bangalore, India at the time and the business model that developed over the course of the next several months involved designing fabric products, working with a couple of women (who I met through an NGO) to create those products and selling them online within India and through a few boutiques. My venture was called Kala Koyree and you can see some of my products here.

Then life changed again in a big way when we moved to Minneapolis - which meant I had to completely re-think my business model. And while I was still pondering and considering options, I found myself sitting on our couch, sipping a cuppa chai with my dear sister Nupur. While she already had her petite hands overflowing with her day job (research!), toddler (adorable!), blogging (onehotstove!), quilting (newsletter editor!), she mentioned that her new-found interest in sewing and quilting was rather haphazardly intruding on her food-centric blog.

Here's what  came out of our conversations: we would start a blog together. It would be the central hub for my patterns and designs, and a place for us both to share our works in progress and finished projects. 

We kick off our blogging journey with the quick tutorial for a fun craft with leftover bits of fabric. Welcome to our very first post...


Go ahead, salvage that selvage!

Last month I completed a custom order for a lovely lady who had bought several cuts of cotton fabric for making pillow case dresses to send to girls in Africa. The pieces all had a variety of prints and when I cut the selvages off before making the dresses, I was left with several ribbons of colorful fabric. Of course I wasn't about to let them anywhere near the trash! What better way to take advantage of the thinness of selvage strips than to cut them into even smaller bits for a lively little mosaic?

So here’s what I started with – A stretched canvas and a jumble of selvage strips.

Step 1. Begin by sorting through the strips and arranging them by color so as to get an idea of the overall color scheme which in turn can bring out some ideas regarding the design. I realized I had more of blues, greens and yellows so naturally I went with water and fish.

Step 2. Once you settle on the design, outline the sections and details (if any) on the canvas with a pencil and mark what color each section should be. Choose a paint shade that complements the fabric that’s going on top of it, but one that is not so close that it drowns the fabric/ paint contrast. After all, part of the charm of a mosaic is the underlying color that peeks through the assemblage.

Step 3. Paint each section according to the markings. I made rough watercolor strokes, but I think acrylic should be fine too.


Step 4. Time to start cutting up! I folded up the strips along the length and cut multiple layers together to save time. Make some straight cuts, some slanting, some biggish, some small – they each will find a place to fit in!

Step 5. Now’s the fun part – laying them out in a pleasing manner. I gave each piece a quick lick of a regular glue stick (hey, I’m a poet!) so that they wouldn't go this way and that while I worked with other sections. It is a little time consuming, but totally worth it. Here’s the first section…..

.... and the rest.

Step 6. Now for the focus of the piece – I really wanted the fish to leap out of the canvas, so to speak, so I decided to cut the selvage in a slightly different way from the background. (In this case, a fish out of water is a good thing!) To this end, I used a combination of thin, long strips and tinier bits for the fish and sea shell.

Step 7. Next I went over the whole thing with a generous coat of good ol’ Mod Podge. And here’s what came of it.

And this is what it finally looks like up on my wall!


Oh, just one more thing before I go. If you’re a little hard pressed for time, but would still like to salvage your selvage: Grab a picture frame, cut a nice looking sheet of paper to its size, think up a design, DON’T cut into very tiny pieces, DON’T Mod Podge, just quick lick glue stick and voila – You have a 15 minute selvage artwork ready for proud display! Here’s what I mean:


Speaking of underwater, what did the fish say when he hit a wall? 'Dam!' :)

We're linking this tutorial to the Sew Darn Crafty Linky Party.