Sunday, September 28, 2014

Crafty Goodies from India

If you're of the crafty persuasion, a visit to India can be a sensory overload- for one thing, the place is awash in color. Even in crowded local trains in sweaty Mumbai, you can't help being dazzled by the vibrant sarees and kurtas of women commuters. And then there are the tantalizing fabric and handicraft shops in the bazaar.

During my trip to Maharashtra this month, I did a bit of shopping for fabric and craft related items- here are my finds.

Let me confess that I have a thing (a big thing) for Indian block prints. So although I have no particular projects planned for these fabrics, I couldn't resist buying these.


My parents know of a shop that sells very affordable sewing supplies; they got me scissors and thread- 100 spools, 2 each of 50 different shades! I now have a lifetime supply to match every fabric.


My mother has a favorite store that sells linens by the kilogram! Many of them are export surpluses and such. There's no saying what you might find in this store, but it is a holy mess, so you just have to get in there and rummage and see what you discover. I've had awesome luck some times. This time wasn't all that great, but I did come away with a large piece of this cotton fabric with blue stripes; I'll cut it into dish towels and maybe embellish them with a little stamped design. 


One of my aunts is a special educator and organizes art and craft camps for her students. We were at a family get-together and she pulled out a craft kit to entertain the kids. You scratch a design on the smooth black paper and brilliant colors emerge. This was a hit with the kids. And can I just say how much I love crafts that are not messy? I bought a couple of kits to bring back.  


An old family friend has started a small business where he makes these darling diyas- they hold a tea light and can be used again and again. My cousin works for him occasionally in his sheltered workshop. My aunt gave me a couple to use during Diwali.


So that's my happy haul. Now to think of something cool to make with all those block prints...any ideas? 

Thursday, September 25, 2014

FREE ePattern and Tutorial - Cool Car Pencil Case

Posted by Kashmira


This is sad but true - there are a million things to buy/ make for little girls out there, but not so many at all for the little guys. When the time came to make something for my friend's son for his birthday, I scratched my head and scoured the internet (not simultaneously) for some appropriate project, but nothing really caught my eye. 

I decided to address this glaring lack of sewable-especially-for-boys projects by creating my own pattern. I thought of what could be most suitable for a boy and came up with - surprise! - a car. Ever since my son was born, I used to think I'd try as much as possible to steer clear of gender stereotypes and let him play with whatever caught his fancy, including dolls, teacups and the like. But the fact is, he seems to be more interested in modes of transport. I don't know what it is, but even a set of stacking cups becomes a pretend car and 'vroom-vroomed' about the floor!

So anyway, I dare say a car shaped pencil case will get a seal of approval from most boys (or girls for that matter!). I started out with a shape that was something like an 80s VW Scirocco, all with the end goal of laying the zipper flat on top. However, the final pencil case left a lot to be desired as regards the cute quotient aspect. So I thought, what the heck, let me go ahead and try a pouch with a curved zipper and guess what - it turned out pretty ok, even if I do say so myself. The little window and wheel appliques also can make it as colorful and fun as you wish. (This has since been confirmed by the gift recipient!)


--------------------------------------------------------------------------------------
Here are some details about the project:

Level: Beginner/Intermediate. (No complex sewing techniques required other than sewing on curves.)

Time Required: 2 Hours or less

Supplies
You’ll need basic sewing tools:  Sewing machine, scissors or cutting mat and rotary cutter, pins, ruler or tape measure, tailor’s chalk or fabric marker, thread, iron for pressing.

* The appliques used on this pattern needs zigzag machine stitch (and zigzag foot, if needed per your machine specifications)

* Zipper foot for sewing the zipper

Fabric supplies:
Fabric sizes for purchasing are indicated below. However, this project calls for relatively small pieces of fabric which you likely already have in your fabric stash. Please refer to the sizes in brackets which indicate what will actually be used for the project.

1) ¼ yard or 1 Fat Quarter fabric suitable for the car (Two fabric pieces sized 11” * 8” required)
2) ¼ yard or 1 Fat Quarter fabric for lining (Two Fabric pieces sized 11” * 8” required)
3) ¼ yard or 1 Fat Quarter fabric suitable for the front windows (Fabric piece sized 6” * 3” required)
4) ¼ yard or 1 Fat Quarter fabric suitable for the back windows (Fabric piece sized 6” * 3” required)
5) ¼ yard or 1 Fat Quarter fabric suitable for the wheels (Fabric piece sized 10” * 4” required)
6) ¼ yard medium weight fusible interfacing (Two pieces sized 11” * 8” required)
7) One 7” all-purpose zipper
8) Two 1” * 1” squares of felt in coordinating colors

Finished Size: The finished car is approx 8" * 6"

Link to ePattern and TutorialDownload the ePattern and Tutorial pdf here

--------------------------------------------------------------------------------------

Learning wise, we encourage you to give this pattern a go for a few reasons:
1) Get some practice with zigzag stitch and appliques
2) Sew a zipper on a curve. After all, riding along a curve can be risky, but steer carefully and you'll soon be home safe!


Monday, September 22, 2014

ePattern and Tutorial - Fully Lined 6 Pockets Cross-Body Bag

Posted by Kashmira


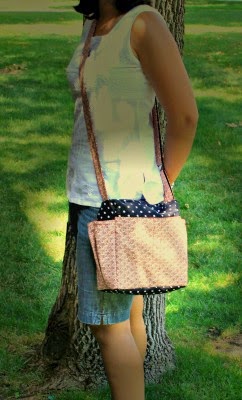
One of the greatest pleasures in life is to give a handmade gift to a person who equally enjoys and revels in the fulfillment of using one's own two hands (with a little help from the sewing machine!) to create something. So when Sis said she'd been looking for a cross-body bag that could double up as her handbag and toddler-paraphernalia container, I decided that was the next pattern I would be working on. Luckily, she was vacationing in Minneapolis at the time so we were able to go fabric shopping together and she picked out her fabric. 

So, a few days and many stitches later, here's what we have for you: a bag that can quickly become your most trusted companion. It's big enough for your everyday essentials like wallet, keys, notebook, cosmetics, a snack, water bottle etc and yet allows you to go about your day hands free! It opens on the top with a zipper, has two open pockets at the front, a zippered pocket at the back, two side elastic pockets and an inner velcro-closure pocket. What's more, it's fully lined!

This pattern gives you the option of making either a regular strap or an adjustable one. Yes, you'd need a bit of sewing experience for it, but you can definitely use this pattern as a skill building tutorial where you can learn to sew zippers, make 4 different kinds of pockets, adjustable straps and more!

Go ahead and try this weekend project and enjoy your cross-body bag!


--------------------------------------------------------------------------------------
Here are some details about the project:

Level: Intermediate. (No complex sewing techniques required other than sewing on curves.)

Time Required: 3 to 4 hours

Supplies
Basic sewing supplies such as sewing machine, thread, needle, pins, cutting mat and rotary cutter (optional), scissors, ruler/ tape, tailor's chalk or fabric marker, iron for pressing.
Additional sewing tool: Zipper foot for sewing machine

Fabric supplies as follows:
1. ½” yard cotton fabric for main bag
2. ½” yard cotton fabric for pockets
3. ½” yard cotton fabric for lining
4. ½” yard medium weight fusible interfacing
5. Two all-purpose 12” zippers in coordinating colors
6. Two pieces of ¼” wide elastic, 5” long each
7. One piece of Velcro 1” wide
8. Key clasp, 2” long ribbon (optional)
9. For adjustable straps: One 1.75” square/D-ring/O-ring and one 1.75” slider

Finished Size: The finished measures 10" * 10" * 3"

Link to ePattern and TutorialDownload ePattern and Tutorial here.

--------------------------------------------------------------------------------------

Lastly, c'mon - did you think it didn't cross my mind that this topic was ripe with cross-body jokes and that I would let you go without one?

What do you get when you cross an elephant with a kangaroo?
Holes all over Australia!

Friday, September 19, 2014

Teal for Two Mug Rug Swap Fundraiser

Posted by Kashmira

Last month I signed up to participate in the Mug rug swap organized by EvaPaige Quilt Designs to raise funds towards Ovarian Cancer. 


Going on now!

The swap involved using a teal colored hand-dyed piece of fabric sent by the organizer/ sponsor to make a mug rug for your partner. Then a few days ago along came a package in the mail that contained the teal focus fabric, my partner's mailing details and also a (very handy) list of her likes and preferences. I was glad to have this because it's so nice to make something for someone that they might actually like!

And here's what my partner put down in her list:
1) That she likes anything with a nautical theme
2) That she does's not so crazy about pink and has a lot of green things around her house
3) That she prefers traditional patterns over modern ones

So then - nautical theme? The color teal lends itself very well to that, hence, check. No pink, include green - that's in keeping with my own preferences too, no worries there. Traditional pattern - umm, slight hiccup there, as I'm really not a very traditional quilter. Well, two out of three ain't bad, eh?

I started by imagining a general look of the mug rug. There had to be waves of course, and a boat or two. So first thing, I pulled out a couple of fabric pieces in shades of blue to co-ordinate with the teal and cut them into strips to put them together like this:


Next I decided on the the approx size of the mug rug. The top portion I thought should be a different fabric that would serve as a background for the boats, so I trimmed an inch and a half from the wave portion and also attached two teal strips to either side to increase the width.


Next I added 3 inches to the wave portion by attaching a piece of off-white colored cotton.


This is about as traditional as I could go! Anyone who's familiar with my work so far knows how much I love appliques. I decided to add a pop of color to the white and blue seascape by appliqueing three sailboats bobbing along the waves.


Next I cut a piece of backing from the lightest blue fabric and a piece of batting, made a sandwich and proceeded to quilt some waves. Also, I basted the three layers together along the edges.

Then I pulled out some fabric that had a bit of brown, blue and also green for the binding that would frame up the mug rug nicely. Here's a great quilt binding tutorial from the Missouri Star Quilt Co


Now all that's left is to hope that my swap partner thinks it's a nice mug rug and not an ugh mug rug!

But on a more serious note, I want to take a moment to think of all those women out there that are battling ovarian cancer (or any other sort for that matter) and pray for them to have hope, strength and resilience to bear the storms which lie ahead and that they come out of it well and healed. 


Monday, September 15, 2014

Blossoms birthday skirt and matching card

Posted by Kashmira


One of my cute nieces turns 5 next month and since she lives all the way Down Under, I wanted to make and send her something that reached her in time for her birthday. I love making clothes and accessories for little girls, so I decided to make her a skirt for two reasons:

1) Who doesn't break out in smiles at the sight of a wee lass twirling about in a pretty skirt?

2) More importantly, I have limited garment making experience/ knowledge and for some reason I'm always reluctant to use ready patterns and like to make my own. But one upshot of this not-so-conducive-to-fabulous-garment-making combination is that I have to think up projects that are uncomplicated but totally wearable. 

So here's my trick for today - I choose the simplest skirt to make and jazz it up with embellishments and detailing. In a nutshell, this particular skirt is nothing but a rectangle with elastic sewn on top, hem sewn on the bottom and sides sewn together. The only other thing you need to know is the approx waist size and height of the lucky girl in question

1) I used this chart to get mine. Then I determined how long the skirt should be (12"). I tripled the waist size to get the width of the rectangle (66"). The wider your rectangle, the more gathered the skirt will look. I added 1.5" to the skirt height to account for casing and hem and finally cut out a piece 13.5" * 66" from a bit of yellow polka dotted knit fabric.

2) Next I folded over twice one long edge and sewed it to create a casing for elastic. The fold should be wide enough for the elastic to pass through.

3) Time to jazz it up. I decided to cut out flowers from orange felt and positioned the smattering of blossoms a little way to the right from the center of the rectangle.

4) Then I hand sewed a button onto the center of each flower. This way the flower is firmly in place, but the petals blow open and free to give that 3-D look. I love these coconut shell buttons I got from my stash in India - they have a dark side and a light side and I used both to add extra detail. 

5) Next I cut a piece of elastic a couple inches less than 3/4 the waist size and attached a safety pin to one end of it. Then I threaded it through the casing.

6) I then lined up the elastic ends flush with the sides of the casing and sewed a 1/4" seam to join the short ends of the skirt with wrong sides together. (This was to create a french seam. If you prefer to use a serger or want to finish to raw edges another way, then just join the raw edges right sides together.)

7) Next I cut the seam 1/8" from the edges, turned the skirt inside out and again sewed a 1/4" seam to complete the french seam. Lastly, I folded over the bottom edge twice and sewed around to hem the skirt. 

That's it - we're done!

Then I made a quick matching card to go with the skirt - a yellow knit cupcake with orange felt frosting!


Our feisty 4 and a half yr old little neighbor girl (who's ever-ready to strike a pose) agreed to model the skirt for me!


Thursday, September 11, 2014

Book Review - Design-It-Yourself Clothes: Patternmaking Simplified

Posted by Kashmira

Name of Book        : Design-It-Yourself Clothes – Patternmaking Simplified
Author                     : Cal Patch
Publisher                 : Potter Craft
Year of Publication : 2009

Book Summary
Design-It-Yourself Clothes is a how-to book on basic garment pattern drafting that includes 5 key projects – A skirt, t-shirt, dress, button-down shirt and pants. It completely lives up to its name – Cal Patch does a great job of explaining the basic principles and terminology of pattern making in a lucid and concise manner. And she does not stop there! Each basic project also comes with instructions on how to apply manipulation methods on the original pattern to get a variety of other looks using techniques like darts and flairs. The end of each project also has a section that includes brief sewing instructions.
  
What’s to like?
Plenty! Over the last few years I’ve designed and made bags and simple infant/ toddler clothing. But clothing for adults? There’s just one catch – unlike infants, they DO care about a good fit! And without any formal training in pattern making, my repertoire was limited by whatever I could fashion from measurements and shapes of clothes I already owned. For a long time I’d been looking for a resource that gives the low-down on the fundamentals of pattern making that includes the stuff that’s not very easy to guess/ come up with – all the formulas, tips and tricks for getting those armholes and sleeves right. And on a visit to our local library I finally found it! The more I read, the more I fell in love and realized this is one book I would definitely want to own. (Cue: log on to Amazon, order book, done!)
  
Three things that caught my eye        
1. There is an entire section devoted to taking body measurements. This makes perfect sense – since that is the very foundation of drafting a pattern for getting a perfectly fitting garment. (Amusingly, Patch even adds a little note to be true to oneself and not put down measurements from high-school days!)

2. Here’s something I’d never dreamed of while fumbling with pattern making before reading this book – according to the laws of patternmaking, all corners where seams meet MUST be right angles! That seems downright absurd at first but Patch quickly goes on to explain how curves finally arise from these right angles.

3. The book also covers notes on fabric usage – that is, what sort of fabric could be suitable for what projects and how drafting a pattern for the same outfit can change depending on the fabric used.

Project I tried
Skirt, Dress, Shirt, Pants? First I simply had to try one of the most comfortable outfits EVER – the quintessential T-shirt. Drafting the pattern was fine, the only tricky part was getting the armholes and sleeve cap shapes right. But again, the book has a method to check and rectify your work. Once I had the pattern ready, cutting out the pattern pieces and sewing the t-shirt was a breeze.

I had a longish, tapering strip of fabric leftover from cutting the front T-shirt panel and so I fashioned that into a ruffle to add some detail to the plain T.

The bottom line
If you have a basic understanding and experience of sewing and wish to set foot in the world of pattern making, or simply to design your own outfits, this book is a great tool to have in your belt. It contains not just the fundamentals, but also enough tips and techniques to allow you to create garments of increasing complexity once you get a practiced hand. Three cheers for Cal Patch!
  
Author’s blog

http://hodgepodgefarm.net/

Monday, September 8, 2014

Fall home decor - apple and pumpkin picking

Posted by Kashmira

We're adding this post to this week's Sew Darn Crafty Linky Party!

This last Labor Day in Minneapolis was great fun - we attended the incredible Minnesota State Fair full of rides and foods and a sea of people as far as the eye could see. In short, it was a party-on-a-stick! And then we went apple-picking with some friends. My little one went right about it and we came home with enough apples to make half a dozen pies. (Not to mention the exceptionally refreshing apple cider!) The hay ride took us all around the orchards and farm - row upon row of apple trees bursting with fragrant fruit and scattered patches of pumpkin with curling stems.

So in memory of our beautiful morning spent among apples and pumpkins, I made this Fall decor piece to put up on our front door. Only hand-sewing needed for this one!


I started by collecting some materials:
1) Orange, yellow and reddish scraps of fabric
2) Small pieces of bright and olive green felt
3) A handful of polyfill
4) An embroidery hoop
5) A piece of burlap large enough to cover the hoop
6) A needle, brown and orange thread, and a pair of scissors
7) Some small twigs


I rummaged through lids in my kitchen to find a circle appprox DASH DASH inches in diameter and cut it out of some orange fabric. Then I did a running stitch all around the edge of the circle.


Next I took a small ball of polyfill (about the size I wanted the pumpkin to be) and stuffed it in, while pulling the thread in.


I went with the thread over the side of the ball and back to the gathered top through the center of the bottom.


Then I cut a leaf shape out of olive green felt and attached it to the gathered top with a running stitch that doubled up as veins. While I was at it, I went ahead and made a yellow pumpkin, this time with a circle with diameter about 1 inch smaller than the first one.


Next I several leaves out of the two green felt pieces and made a running stitch through the centers of each to give them some 'character' as they say :)


At this point I went out to forage around for some small twigs, which I quickly found and brought back. 


Now on to the apples - I cut a few circles (they need to be significantly smaller than pumpkins) from apple fabrics. 


I did the same thing as with the pumpkin, except that I made a teeny cross on the underside to give it that little bump at the bottom. 


Next I chose a nice branch-looking twig, cut a small leaf from felt and attached the apple to it by making little stitches. 


...And onward with the other apples and leaves. I then attached other small leaves to the twig by taking the needle right through the twig (carefully, without breaking it.)


Then I stretched the burlap over the embroidery hoop and after trimming the burlap all around the back, I tacked the apple branch onto it like so.


I did the same with the pumpkins and their leaves and voila! Here it is hangin' up on our front door.


Thursday, September 4, 2014

Pan Handle Covers: Our 'Hottest' idea yet!

Posted by Kashmira

Quick note: We're sending in this post to the September Sew Crazy Challenge at Crazy Little Projects. This month's theme happens to be In The Kitchen!

Here's a not-too-uncommon scene from our kitchen: Either my husband or I am cooking something mouth-watering in our beloved Lodge cast-iron pan (Sometimes we cook together and sometimes we fry solo). When it's all done we announce 'Dinner's ready!' with great panache, which swiftly turns to pan-ache as, in haste, we burn our fingers on the searing pan handle. Then once I stop pan-icking, I remind myself to make one of those nifty pan covers to safely man-handle my pan-handle.

I'm glad to say I've finally gotten around to doing it. (Making a pattern can sometimes be quite a process of trial and error. I didn't like the first one I made, so off it went from the frying pan into the fire!). Later I decided to make a corn-on-the-cob cover. I started by measuring the length and width of the pan handle. Next I drew a rectangle that measured (handle length + 1") by (handle width + 1"). Then I folded it in half lengthwise and drew and cut out a sort-of curvy triangle shape like so:


Next I cut out 2 rectangles each (that measured the same as our original one) from yellow polka-dotted fabric, yellow lining fabric and batting.


I made a sandwich by first placing the batting piece on work surface. Second placing the polka fabric right side up and third placing lining fabric on it wrong side up. Ditto for the other sandwich. Then I traced the outline of the curvy triangle template on both sandwiches and marked gaps about 2" wide for turning inside out.


Then I sewed around the outline and cut along it 1/4" away from the seam. Next I made notches to get those nice curves....


....  and turned them inside out.


After that I just put them together lining sides facing each other, sewed around and left a gap at the tapered end to slip onto the pan handle. 


Now for the detailing: I cut the husk by positioning the cob on some green felt to get its shape. And again on the opposite side. 


Then I just placed the husks on the cob and sewed around the edges. That's one corny pan handle cover ready!


Well, once I started I couldn't stop - it's like a Pan-dora's box opened up and I ended up making a couple more covers using the same curvy-triangle shape. For eg, I split the triangle into two parts - one part icecream and one part cone, seamed together. Then the rest of the steps were the same, with the addition of a cherry on top. Here's how:


For the next one - a fish, I split the triangle again, but this time on the tapered side. And of course I sewed a button onto the it. After all a fish without an eye is just 'fsh'.


And that's how one little pattern piece can result in completely different but equally delightful little covers. 

I haven't made all these yet, but will list them here anyway - a watermelon slice, Christmas tree, pie slice, pizza slice, carrot, okra, rocket....

So is there pan-demonium in your kitchen too? If you come up with an idea for using the curvy triangle and make a cover with it, don't forget to share it with us!