Thursday, January 15, 2015

30 minute Envelope Cushion Covers

Posted by Kashmira


A couple of months ago we got some cushions by way of furthering the furnishing of our home. Cushions have a way of instantly bringing in a pop of color and comfort. One of the cushions came with a lime green cover and the other two were just pillow forms. So when I finally got around to making covers for them, I decided to make the easiest and quickest kind - the envelope style cushion covers.


Measuring and cutting - Making your own cushion cover is really quite simple and can work very well as a beginners' project. The first thing to it is to measure your cushion and cut your fabric. The envelope cover is made of 3 pieces of fabric: One square piece that makes the front, and two rectangles that overlap each other and form the back. This facilitates getting the cushion insert in and out of the cover and does not require a closure due to overlapping fabric.

So the basic formula I use is this:
1) Measure your cushion and add 1 inch to get the front square.
2) Divide the cushion measurement by 2 and add 4 inches to get the length of rectangles at the back.

For eg, suppose your cushion measures 20" * 20". The fabric measurement will be as follows:
1) The front square should measure 21" * 21"
2) The back rectangles should measure (20 divided by 2) + 4 = 21" * 14"

Now, the cushions that I got tend to get really squishy under weight but fluff back up once the weight is removed. It was clear that the cover needs to be very very snug. So I actually did not add that extra inch in the formula and just used the actual cushion size which was 20".

Step 1) Moving along then, I cut the 3 pieces of fabric required - the front square and back rectangles.

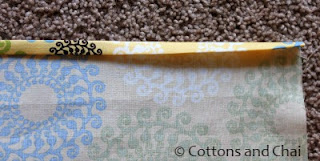
Step 2) I folded the one long edge of each rectangle 1/2" twice and pressed the fold well.


Step 3) Next I hemmed the folded edge by using a straight stitch on the machine. Repeat for the other rectangle.

Step 4) I placed the front square right side up. Then I placed one of the rectangles on it right side down such that the raw long edge on the rectangle was aligned with the bottom edge of the square. I pinned this in place.


Step 5) Then I placed the second rectangle right side down such that it's unhemmed edge was aligned with the top edge of the square and pinned in place. At this point you can see that the hemmed edges of the two rectangles overlap and this will produce the envelope at the back once we're done sewing.

Step 6) I sewed all the around all 4 sides of the square with 1/2" seam allowance and went over it twice to secure the stitches and make the cover sturdy. Next I clipped the corners.


Step 7) Then I turned the cushion cover inside out and ironed it flat. That's it - we're done!


Similarly I started on the other cushion but realized I did not have enough fabric to use on the entire cushion. So I cut up strips of a combination of fabrics and attached them together first to make the front square, then proceeded as usual.


Monday, January 12, 2015

The Dishcloth Ran Away with the Spoon

We visited friends in St. Louis over New Year's Eve and I wanted to bring them small gifts. These days I prefer giving consumable and functional gifts, especially for grown-ups, because aren't most of us already weighed down by too much stuff? So my gifts consisted of Georgia-grown pecans, jars of locally canned pickled green tomatoes, homemade biscotti and hot chocolate mix and some appliqued dishcloths.

When I was in India last year, my mother took me to a wholesale cloth merchant where fabric goods are sold by weight. Once in a while you get lucky and find something good in this shop. I found a large swatch of cotton material with wide stripes that looked pretty much perfect for dishcloths. I started by cutting the big fabric into 6 dishcloth-sized pieces and hemming each one. Easy peasy.


Some embellishment was called for. My quilting teacher gave me some pretty berry-themed fabric and I put some medium-weight adhesive interfacing on it . I took a wooden spoon right out of my kitchen and traced in on some cereal box cardboard to make the template. Then I cut out the spoon shapes from fabric and ironed them on the dishcloths.

Using my new (yay!) sewing machine, I used a buttonhole stitch around the appliques to secure them. Easy and pretty cute!


Monday, January 5, 2015

A Lampshade for Krishna

Posted by Kashmira

...And the garden projects continue. This is the story of a Krishna statuette carved from a scrap block of wood that some artisans were selling by the roadside in Mumbai in 1975. My parents were medical residents there at that time and decided to get the carved Krishna for their apartment. 

He started out as just a wooden carving that my parents placed in the garden once they moved to this house and regularly varnished to preserve it and protect it from the elements. In time, when they were doing up the garden and wanted to spruce up a plain-looking stone wall, they made a grotto-like arch structure and gave the statuette its own little corner. (The lamps painted on the bricked arch are called 'Lamandiva' and 'Samai' in Marathi and are painted there by mom's multi-talented receptionist.) Almost 40 years on, the wood seemed to have dulled a little, so mom took it upon herself to brighten it with color. And now here it stands among the greenery.


The only sore point? Mom is unhappy with the naked light bulb hanging alongside, so here's my attempt at making a 15 minute lampshade for it.

I roughly measured the light bulb and cut a scrap card paper and some brocade remnant from a sari (blue, because it is Krishna's color) slightly larger than the paper.


Then with glue (Fevicol, arguably India's favorite brand) stuck the fabric to the paper. Yes, the glue shows through as messy dots, but it does dry completely with time. 


Next I folder the fabric over to the wrong side and glued it in place.


On the outside I added some brocade ribbon detail.


Then I rolled the prepared card paper, overlapped it and stapled it together to create a cylindrical lampshade.

I simply tied a coordinating brocade ribbon in the center to keep it together. The 15 minute lampshade was ready!

Next I just threaded some ties on either side of the cylinder to hang up the lampshade.


But, I made a pretty significant mistake. I used a thickish card paper to provide structure so the resultant effect when the bulb is switched on is not what I aimed for. I should have either cut striped holes in the paper so the light shines through or just used the thick card paper as rings on the bottom and top. So who knows, maybe you'll see a follow-up post on this lampshade. In the meantime, anyone that can throw more light on making a better lampshade will be much appreciated!

Friday, January 2, 2015

A New Year and A Clean Slate!

Posted by Kashmira


So, yet another new year has rolled around and here we are again after our brief hiatus. Let me start off by wishing everyone a wonderful, joyful, fabricful and craftful new year! 

Our trip back home to India the whole of last month has been so full of visits to dear family and friends that the days just flew by and left my little toddler utterly confused about where exactly we were and why we packed our bags and left for yet another destination every few days.

But now we're finally at my parents' house where we will stay put for a couple of weeks. I've mentioned before how my Mom and Dad are into handmade and creative stuff. Which is why one of the fun parts of being here is the constant stream of art/craft projects that my parents undertake around the house - and now once more I find myself participating in them.

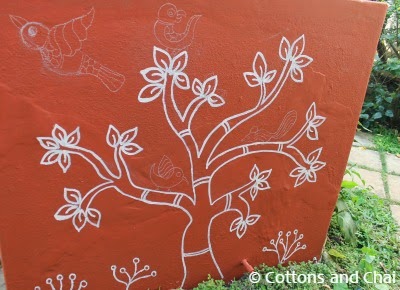
So here's the project I've decided to post about as the very first for the year 2015: Out in the backyard sits this large cement cube that serves as a water storage tank. It used to just be grey and dull until my mom took up its beautification and got a nice coat of terracotta color painted on it a few years ago. Then the other talented and artistic members of my family - namely my aunt and cousin who are both trained artists painted some incredible warli art on it. Alas, time went on, the paintings faded and mom reluctantly had to get a fresh coat of paint done last week. So when I arrived we got busy coming up with a new design to decorate the water tank that was once again a clean slate.

We've always had an affinity towards folk/ tribal art and those basic, earthy drawings feel very much at home in my parents' small but well maintained and beautifully green garden. I looked at a few Indian tribal art paintings on the internet, drew my interpretation of them on a notepad. I've always gravitated towards trees, so that's what I went with after approval from the supervising officer (mom, of course!). Then I drew the pictures on the water tank with chalk (tailoring chalk, because that's the only kind we had!) 

Then I went over the drawing with some white oil paint since that's what truly stands out over the vibrant brick red background.


Here's what it looked like once the detailing of the tree was done. It took me an hour and a half to finish this wall. A special mention to my parents who kept the toddler otherwise engaged (with balloons and cars) so that I could paint in peace.


Among the woodland creatures we added were a flying bird, a perched bird, a squirrel and a coy parrot.


Similarly the other side got a deer and peacock amidst a couple of trees.


And I could not resist posting a picture of my parents' delightful garden - complete with a sit-out and hammock. Look closely, you can spot the coir-roped swing hanging from a thick branch of the mango tree. It is the 'grandchild' swing, that's put up only when a little one visits! Needless to say, everyone, young and old falls in love with this little sun-kissed patch of land!