
Out of all the sewing I've ever done, I love doing appliques the most. They allow boundless freedom in terms of the actual motif and pulling fabric for the little shape to come together is a very enjoyable process.
While regular appliques are fun to do, I think 3D appliques are fun times three! A textural motif can make your project surface that much more interesting and experimenting with different fabric techniques to suit the motif can be so rewarding when it all comes together in the end. So here we bring to you a 3 part 3D fabric applique series.
Here's what I plan to present as part of this series: A single motif, applied to a fabric surface using 3 different 3D applique methods. The first thing I had to do was come up with the motif itself, and after a bit of thought I have decided upon the quintessential cupcake, seeing as baking season is upon us. And not least because it is one of the most commonly used motifs when it comes to sewing - right from quilts, dresses, aprons to girly purses and what have you!
So let's get right down to it. We will be using the ruffle or fabric gathers technique for our first 3D applique method. Here's what I used:
1) A piece of pink cotton fabric 20" * 3"
2) A piece of brown cotton fabric 3.5" * 3.5"
3) A piece of coordinating cotton fabric 3" * 3"
4) A piece of off-white cotton fabric 8" * 8" as applique background
5) A pink button
Step 1: I started by basting one long edge of the pink fabric twice, the second basting line going about 1/4" below the first.
 Step 2: Gather the fabric to create ruffles by pulling on the top threads (ignore the bobbin threads)
 Step 3: Hem the other side of the ruffles (* Ideally this step could be done right at the beginning, or even before creating the gathers. In my excitement to begin I missed this step and did it just now.) Then cut the ruffles in half so you have 2 gathered sections of similar length. Pleat and pin one of the two sections to fit a 5 inch length.
 Step 4: Pleat and pin the other section over the first to make a double decker cupcake.
 Step 5: Sew the top section to the bottom one by sewing over the hemming. (To avoid two stitching lines.)
 Step 6: Since I pretty much like to work freestyle, I just trimmed the corners to give it a cupcake-y shape.
 Step 7: Next I cinched the top a little and sewed through below the basting stitches.
 Step 8: Then I trimmed the basted part to get rid of that extra bulk.
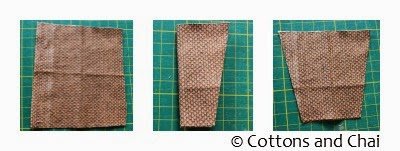
 Step 9: Next I took the square piece of brown fabric and folded it in half. I made a slanting cut from one side to the opposite side to give it a cup cake liner shape.
 Step 10: Then I just cut a frosting shape out of some coordinating fabric to cover the top of the cupcake.

 Step 12: Then I pinned the cupcake overlapping the liner.
 Step 13: Next I appliqued it in place.
 Step 14: And the last piece to be appliqued was the frosting which covered up the top raw edge of the cupcake.
 Step 15: Lastly I sewed a button on and the yummy little cupcake is done!
 Stay tuned for the next two 3D applique techniques! And here's one for the baking season: What's a baker's motto? All's well that does swell!
While regular appliques are fun to do, I think 3D appliques are fun times three! A textural motif can make your project surface that much more interesting and experimenting with different fabric techniques to suit the motif can be so rewarding when it all comes together in the end. So here we bring to you a 3 part 3D fabric applique series.
Here's what I plan to present as part of this series: A single motif, applied to a fabric surface using 3 different 3D applique methods. The first thing I had to do was come up with the motif itself, and after a bit of thought I have decided upon the quintessential cupcake, seeing as baking season is upon us. And not least because it is one of the most commonly used motifs when it comes to sewing - right from quilts, dresses, aprons to girly purses and what have you!
So let's get right down to it. We will be using the ruffle or fabric gathers technique for our first 3D applique method. Here's what I used:
1) A piece of pink cotton fabric 20" * 3"
2) A piece of brown cotton fabric 3.5" * 3.5"
3) A piece of coordinating cotton fabric 3" * 3"
4) A piece of off-white cotton fabric 8" * 8" as applique background
5) A pink button
Step 1: I started by basting one long edge of the pink fabric twice, the second basting line going about 1/4" below the first.
Step 11: Now on to actually sewing it on the work surface. When it come to appliques, it's best to start with the piece that's going to be bottom-most, continuing with the next and finishing with the one that should be top-most. That's how I started with the cupcake liner, since the bottom edge of the cupcake would sort of spill over at it's top.
Wow very nice....I doño how you get time to do all these beautiful stuff along with your kid...I am mom of 2 kids and just love crafting and sewing very much....but don't get time to implement my ideas..hope some day I too share my projects with you... Just love your creative projects....
ReplyDeleteVery Yummy....What setting on the sewing machine have you actually used to applique it in place? I have tried zigzag before, but it did not look very neat
ReplyDeleteThe machine I currently use is Janome 3125 (my birthday gift this year from partner-in-craft sis Nupur!). So this machine doesn't have dials to select specific stitch length/ width, rather it just has 10 different stitches out of which 3 are zigzag stitches with small, medium, large stitch length/ width. I used the largest on this one. If your experience with zigzag wasn't satisfactory I'd suggest getting a piece of scrap fabric and trying out different combinations of stitch length/ width on your machine to find a suitable one. Keep in mind that the aim is to get a satin stitch sort of look that will overlap as much of the raw edge as possible - so you should probably try a smaller stitch length with varying widths. Good luck! Let me know if it worked!
ReplyDeleteCan u give tutorial on handmade applique as I don't have sewing machine...please can u tell how Orissa applique cone hangings can be created ...
ReplyDelete